I’ve continued my exploration of 3-D virtual modelmaking, endeavouring to forever improve my practice. Working at the Burton Art Gallery some weeks ago I was unable to include the bases of some of the big harvest jugs and delicately decorated puzzle jugs because turning them upside down, on a turntable, would have been too dangerous because their rims were very small in comparison to the weight of their bodies, they were uneven or extremely fragile. Simply lying them on the side did not work because their smooth rounded surfaces would not stay in one place and they would always dangerously wobble!

 In my studio I found that using a rubber ring in the centre of the turntable would support a spherical object very safely. At first, I tried with rubber rings or rubber washers that I had in my toolbox. The largest of these, probably from a plumbing waste pipe assembly, worked very well with some jugs that I had at hand. I would need something bigger though for the harvest jugs that I intended to photograph. We were in lockdown so I searched various online shops with little joy. I had expected DIY shops just to be selling rubber washers as part of a set for a specific use. However, B&Q had a couple of very useful items; A 2-inch cistern coupling and something similar for toilet repair. The black pure rubber items were perfect for holding these valuable delicate jugs in place on a moving turntable.
The quantity and brightness of light for photogrammetry is really important because it is necessary for closing the lens aperture down and so helps in producing a well-focused object; this in turn makes a better 3D Model with a background easier to mask out. With this in mind I had invested in a new pair of 1000-watt studio flash heads.
Another day-shoot was organised for the Burton, just before they opened again to the public. I was keen to try out my new process on the historic jugs that had been most problematic last time, and to use my new lights. I constructed a studio with a jet black background and placed my heavyweight automatic turntable on the sturdy table. The 1000 Watt studio flash heads were directed towards the white ceiling to ensure a very soft and diffused overhead light. A small reflector threw some light back from the camera view into the shadow areas underneath the jug. Another first for this shoot was syncing my heavyweight turntable, which could take loads of up to 40kg, with my Syrp Genie Mini; which was itself synced with the camera and studio flash. The first object, a large harvest jug, was placed on the rubber washer on the turntable, and it was beautifully balanced as I had hoped. A QP card was used to ensure correct white balance. A full rotation off the jug was controlled, via a Bluetooth connection, by my Syrp iPad app. The process seemed to work seamlessly. The only problem I had was that the new flash heads tended to overheat after prolonged continuous use on full power. This was overcome by allowing them to cool every so often.
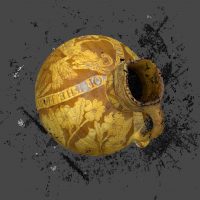
280 photographs of the Harvest Jug, shot in RAW, were transferred to my computer. I performed basic adjustments in Lightroom, white balance and exposure, then exported the files as HQ Tiffs to a folder. These were fed into Metashape photogrammetry software to create the 3-D virtual model. A decimated version was then uploaded to the Sketchfab platform.
The process was repeated with a Puzzle Jug, 212 photographs were taken in a similar fashion. The computer processing time required for the virtual model making was a good 12 hours; aligning the photographs, building the dense cloud, constructing the mesh and finally adding the texture.
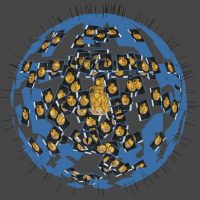
Camera positions
Cleaning the background
Most of this was automated and could be left over night with the monitor turned off. However, with careful selection, it ought to be possible to half the time by halving the number of photographs.
Addition: Since writing this post I have gone through the Metashape construction process with almost halved the number of photographs, 147, and made an almost identical 3D Model. See it here Model from 147 images The first stages in Metashape, Aligning Photos and Building the Dense Cloud were still very long, but there was less background to clean up and the latter stages were considerably faster. Compare the 2 models and see if you can make out any differences.
I started blogging about this part of my professional arts practice in May. If you’ve got this far down the page you might also be interested in my previous blogposts on the subject; Photogrammetry and 3D Models of Museum Objects