blog-image

Photo Teaching in Primary Schools, Part 1: Introduction


How do you teach photography to primary school children? That was the question I set myself prior to starting my work with Beaford Arts on the storytelling project A Voice to Tell Our Story. My own background in teaching had been primarily Further and Higher Education with a year in the USA in a High School with children as young as 14 and the occasional Beaford workshop day with Primary school children. How high or low do I set the bar; how much can children of this age understand? Set the bar too high and all but the very gifted will switch off, set it too low and it will not be challenging enough, the children will soon lose interest.

Many of the sessions were team taught with Matt Biggs, the filmmaker on the project. Matt’s experience was much like mine; many years of working within photography and filmmaking and with plenty of teaching experience but only with young people and adults, none whatsoever at this level! However, this enabled us to find solutions together, to try different approaches, reflect on their effectiveness and to make adjustments, often within the same session.

We always started with an introduction to ourselves and our own personal image making through a slideshow of images in my case and some film clips in Matt’s. Matt and I would describe ourselves as creatives within our chosen media and the images we showed the children would inspire them because it was both professional and visually stimulating.

Photographic history was introduced to give a context to our own work and the image making that they would be doing for the storytelling project. This was started, like most new concepts, with a mixture of practical and illustrated presentation, always with questions and answers. I brought in a very cheaply made camera obscura; a brown box with a small hole on one side covered by a simple lens and the opposite side being cut away and replaced by tracing paper. A couple of children would then volunteer, one holding the magic box and the other, whose face was lit by a bright studio light, stood close by. The child with the box would move it forwards and backwards until seeing something on the screen. This simple, practical experiment was hugely successful, the children getting very animated with excitement once they were able to see the upside-down face in the box. The camera obscurer was then illustrated on the classroom smart board.

Sketchbooks were introduced very early in the project. It had always been our intent to run the photo/ filmmaking sessions in an art school fashion, but there was also a very practical use for the sketchbooks. Class sizes we’re often in excess of 30 and our teaching methods were severely limited addressing the whole class all of the time. A class was often split in half or into quarters, with smaller groups of children learning different things and working on different tasks. The sketchbooks became a perfect tool for independent or small group work, writing up an exercise, editing images, writing scripts, reviewing or drawing.

I introduced children to the Panasonic Lumix camera in their first session with me. At first, I had set the cameras up in complete manual mode, with a black and white screen, as a way of teaching the fundamental technical skills using shutter speed, aperture and sensitivity. This worked extremely well with some of the older, year 5 children, but some of the younger or less able became lost in confusion. To enable more children to get good results at an early stage, I changed the default setting to shutter speed priority. A big advantage of the Lumix camera is the wide aperture of it’s Leica lens, and so f2.8 was set as default, giving the children images that very much looked like they had been shot with a camera rather than a phone.

The early practical exercises were all about experimenting with those camera settings and making visually interesting compositions. Subject matter was less important than a range of shutter speeds to freeze and blur images, different lens lengths and angles of view. Images were later reviewed on the classroom smartboard to learn from good practise and to increase their vocabulary.

Some of the photographs the children made were based on photographs in the Beaford Archive by James Ravilious and Roger Deakins. Ravilious had made many photographs within primary schools in the 1970s and 80s and some of these were recreated by the children in their own classrooms or playgrounds, or similar, contemporary images were made to show how things have changed. The freedom the children were given to express themselves through their photography, at this introductory level of the programme, brought unexpected rewards. These images became in themselves a story of school life in the 2020s.


blog-image

Digitisation Part 3 – Making copies of negatives

“Creating digital surrogates for 10,000 negatives will facilitate improved access and significantly reduce the impact on the original negatives. The newly digitised material will also provide inspiration for our activities. A digital master archive image will be produced at a high resolution which will minimize the need for subsequent rescanning and retains the maximum amount of data. This RAW mastered file will be immediately archived.”

James Ravilious Negative Sheet

Photographic negatives hold far more image information than the resulting print. There is a far greater range of grey tones, and the photographer chooses how much or how little of this information is to be made visible in the final print. The amount of contrast is controlled through choice of grade of printing paper, 1-5, where 1 is low and 5 is high contrast; or through using variable contrast paper in combination with coloured filters to produce a similar result. Brightness and darkness of tones is achieved through the time exposure of the paper to the enlargers light, focused through the negative. And a fine control of exposure here is achieved through ‘dodging’ and ‘shading’, where the photographer can selectively darken or lighten areas of the print through selective exposure to light. The photographer desires an information rich, full tonal range negative, one which is correctly exposed and developed, for the greatest opportunity to create a fine print from it.

A negative isn’t created in digital photography, the closest thing we have in terms of an image file which holds greater information than our final print is the RAW file. The RAW file holds more visual information than is possible to see in a print and, similar to the negative, the photographer can select what to include in the final digital image or print.

“In line with recommendation from our Digital Consultant, Elizabeth Fife-Faulkner, we will employ the photographic capture method. This method allows faster image capture than the traditional flat-bed scanner method, produces higher quality results and is fast becoming the industry standard. In addition, the method reduces the instances of static, a significant issue for archive materials and in particular for 35mm photographic negatives.”

Recommendation for copying negatives

Most of the Digital Consultant’s recommendations were implemented but a popular method of copying a negative or slide using a camera, bellows, a lens and flash was hotly debated right at the onset of the Hidden Histories Project. The concern with this method was that of contrast, the longstanding digital printers of the Beaford Archive images at Focal Point in Exeter suggested that a LED light source would be lower in contrast and therefore help produce a greater range of tones in the digital copy. This was also in keeping with James Ravilious’ preference for old uncoated lenses for his Leica camera because he disliked the modern higher contrast lenses.

Bowens Illumitran

Focal Point were able to convert an old Bowens Illumitran Slide Copier, which originally had it’s own flash light source, into an LED copier more suited for our needs. This cobbling together of the best of old and new technologies was very much in keeping with the spirit of Ravilious!

Negative Digitisation Process

10,000 images of the 80,000 negatives that exist in the Beaford Archive, roughly 1000 of Deakins and 9000 of Ravilious, were selected by a curator from the contact sheets I had scanned and created digitally. This information including negative number, description, date and notes, was received on an Excel spreadsheet.

Once the apparatus was set up, cleanliness and keeping surfaces dust free were key through regular dusting with compressed air. Negatives, which are removed from their archival sleeves by their sprocket holes with tweesers, were only handled by their edges.

The guys at Focal Point recommended that the optimum lens was a Rodenstock 60mm f4 enlarger lens. I discovered that it’s ‘sweet’ spot, where the grain of the negative was in focus right to the corners was between f8 and f11. My natural instinct had been to close the lens right down to f22 but this resulted in a softening of the image.

Once an exposure was achieved with a slight clipping of the negative’s highlights (a prints shadow image) I bracketed the RAW exposures by a third of a stop each way. Photographic film base for Ilford HP4 and later HP5 is the same density and so the only variation on exposure is through fogging to light or the occasional fixer stain. Many of the films have a variety of exposure and over/under development but this doesn’t affect the copying exposure to digital a great deal.

I then worked in batches of 10 films at a time which, at 4-5 pictures per roll that the curator had chosen, equaled approximately 45 images per folder. This gave me both a simple, straightforward filing system and a reasonable number to invert to positive images, adjust levels of exposure and spot out dust, scratches and hairs later on. (I’ll go into this in detail in a future post). After every batch I checked the focus and made adjustments if needed. The images were downloaded and a best of the 3 bracketed exposures was saved for each image. The Nikon RAW NEF files were converted to RAW .dng files because this format is considered universal and more archival because it isn’t associated with a particular camera brand. These files were then immediately backed up so that duplicates existed.

Ravilious digitised negatives viewed in Adobe Bridge

Digitisation Part 4 Thoughts on Ravilious and Deakins at Beaford

blog-image

Digitisation part 1: James Ravilious Contact Sheets

I’ve started an 18 month freelance contract for Beaford Arts. My work is to digitise 10,000, 35mm, black and white negatives, of James Ravilious and Roger Deakins. These date from 1971 to 1989 and cover all aspects of life in rural North Devon.
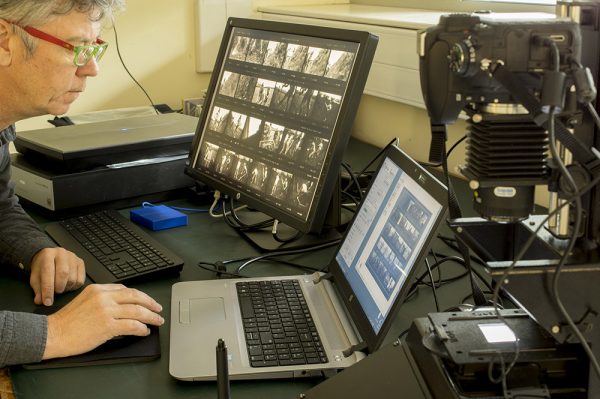
Bowens Illumitran converted to LED for copying negatives is on the right of the image

The archive of negatives is held in a climate controlled, fireproof, strong room at the Devon Heritage Centre in Exeter. This is where the negatives must be kept and downstairs in a conservators office is where I have my work place seen in the images above.

“..James Ravilious’ work includes a complete collection of contact sheets made by the artist. These will be digitised by the Digitiser using a flatbed scanner. Most contact sheets will be straightforward scans, however, some have overlapping images and exposure issues to resolve in digitisation.”

“All Ravilious contact sheets will be digitised to a high enough quality to enable negative selection to take place and research and background data to be gathered without repeated handling of the original contact sheets. ‘Good’ and ‘Best’ images will be marked up on digital contact sheets by the Digitiser, referencing the original database, to ensure easy reference and prevent repeat selection. Two sets of digital contact sheets will be made one for negative selection, and one left unmarked to reveal James’s original markings only, for dissemination purposes. Tests suggest scanning contact sheets at 600dpi enables high quality images suitable for on-screen viewing purposes.”

James Ravilious started his commission from Beaford Arts to “show north Devon people to themselves, in 1973, continuing the Beaford Archive started a year earlier through Roger Deakins (who became the great Hollywood cinematographer). The first two months of my contract have been spent scanning all 2306 of Ravilious’ contact sheets on an Epson Perfection V800 Scanner. This was the first stage of the process to archive the contact sheets digitally so that in the short term a curator can select approximately 9000 of his images for digitisation and in the long term the digitised contact sheets can be themselves searchable items in a database. Ravilious worked right from the start with an archive in mind; archivally processing his negatives as best he could (developing, fixing and washing his negatives in an often difficult, imperfect working environment) and numbering, filing and storing his negative bags and contact sheets. He also annotated his contact sheets on their face and rear indicating his prefered best images, description of place, name of subject etc.

A small percentage of the contact sheets (and negatives) had been archively rehoused in separate new folders prior to my start which speeded up the digitising process. However once I got to view the contact sheet and negatives together in the same folder I noticed some negative strips and many ‘end of film’ negatives which didn’t make it onto the contact sheets. I started to make digital copies of these to add to the digitised contact strips but then abandoned this extra time-consuming work, marking negative bags with ‘post-it’ notes for later in the life of the project.

There were 2 or 3 sets of negatives, and occasional single frames, which had yellowed through under fixing or inadequate washing at the original time of processing the film. These films are not archival and will not last in the long term and will need re-fixing and washing in the coming weeks.

Although the negatives were all black and white I scanned them in colour to preserve the highlighted annotations, often in red pen. However, the drawback of the colour scan was often a slight colour shift towards green or blue, so a selective colour desaturation was applied in Photoshop afterwards. There were also handwritten annotations on the rear of Ravilious’ contact sheets which will need digitising and archiving later in the project.

Today, photographing digitally, one gets used to getting a ‘correct’ exposure. Most people now shoot everything automatically and today’s technology enables us to achieve excellent exposures for most of our photographs. Even professionals, myself included, who use a camera manually, are used to checking our pictures at the time of shooting so that any adjustments to exposure can be made there and then. These same professionals will benefit from incredible advances in sensitivity to light when taking pictures, in comparison to the 100-400 iso films used by Ravilious in the 1970’s & 80’s; and also shoot in RAW, benefiting from its greater exposure tolerance. So it shouldn’t have come as a surprise to find James Ravilious’ contact sheets having both inconsistent exposure, one to the next, and having under and over exposure within a single film. But it did, because the last time I photographed on film was last century, and my last monochrome film was probably at the time Ravilious finished his work for Beaford Arts.

Therefore, digitising James Ravilious’ contact sheets, preserving them archivally for eternity, was a greater task than it seemed. Each sheet needed slight adjustments to exposure at the scanning stage through tweaking the levels of the histogram. Each digitised sheet needed adjustments for some of its images. These adjustments were not to perfect the images, or ‘make good’ his exposure, but to enable a reader of the digital contact sheet to be able to see what the image was, and in the short term to enable the project curator to identify images (negative) to be digitised.

I feel quite privileged to be one of probably only a handful of people to have seen 9,000+ of James Ravilious? images, albeit small and with little detail, and to have gained an insight into his working practice through seeing 2,300+ of his contact sheets made in chronological order through his time at Beaford.

Digitisation part 2: Roger Deakins’ Contact Sheets