blog-image

Photo Teaching in Primary Schools, Part 1: Introduction


How do you teach photography to primary school children? That was the question I set myself prior to starting my work with Beaford Arts on the storytelling project A Voice to Tell Our Story. My own background in teaching had been primarily Further and Higher Education with a year in the USA in a High School with children as young as 14 and the occasional Beaford workshop day with Primary school children. How high or low do I set the bar; how much can children of this age understand? Set the bar too high and all but the very gifted will switch off, set it too low and it will not be challenging enough, the children will soon lose interest.

Many of the sessions were team taught with Matt Biggs, the filmmaker on the project. Matt’s experience was much like mine; many years of working within photography and filmmaking and with plenty of teaching experience but only with young people and adults, none whatsoever at this level! However, this enabled us to find solutions together, to try different approaches, reflect on their effectiveness and to make adjustments, often within the same session.

We always started with an introduction to ourselves and our own personal image making through a slideshow of images in my case and some film clips in Matt’s. Matt and I would describe ourselves as creatives within our chosen media and the images we showed the children would inspire them because it was both professional and visually stimulating.

Photographic history was introduced to give a context to our own work and the image making that they would be doing for the storytelling project. This was started, like most new concepts, with a mixture of practical and illustrated presentation, always with questions and answers. I brought in a very cheaply made camera obscura; a brown box with a small hole on one side covered by a simple lens and the opposite side being cut away and replaced by tracing paper. A couple of children would then volunteer, one holding the magic box and the other, whose face was lit by a bright studio light, stood close by. The child with the box would move it forwards and backwards until seeing something on the screen. This simple, practical experiment was hugely successful, the children getting very animated with excitement once they were able to see the upside-down face in the box. The camera obscurer was then illustrated on the classroom smart board.

Sketchbooks were introduced very early in the project. It had always been our intent to run the photo/ filmmaking sessions in an art school fashion, but there was also a very practical use for the sketchbooks. Class sizes we’re often in excess of 30 and our teaching methods were severely limited addressing the whole class all of the time. A class was often split in half or into quarters, with smaller groups of children learning different things and working on different tasks. The sketchbooks became a perfect tool for independent or small group work, writing up an exercise, editing images, writing scripts, reviewing or drawing.

I introduced children to the Panasonic Lumix camera in their first session with me. At first, I had set the cameras up in complete manual mode, with a black and white screen, as a way of teaching the fundamental technical skills using shutter speed, aperture and sensitivity. This worked extremely well with some of the older, year 5 children, but some of the younger or less able became lost in confusion. To enable more children to get good results at an early stage, I changed the default setting to shutter speed priority. A big advantage of the Lumix camera is the wide aperture of it’s Leica lens, and so f2.8 was set as default, giving the children images that very much looked like they had been shot with a camera rather than a phone.

The early practical exercises were all about experimenting with those camera settings and making visually interesting compositions. Subject matter was less important than a range of shutter speeds to freeze and blur images, different lens lengths and angles of view. Images were later reviewed on the classroom smartboard to learn from good practise and to increase their vocabulary.

Some of the photographs the children made were based on photographs in the Beaford Archive by James Ravilious and Roger Deakins. Ravilious had made many photographs within primary schools in the 1970s and 80s and some of these were recreated by the children in their own classrooms or playgrounds, or similar, contemporary images were made to show how things have changed. The freedom the children were given to express themselves through their photography, at this introductory level of the programme, brought unexpected rewards. These images became in themselves a story of school life in the 2020s.


blog-image

A Voice to Tell Our Story

Back in the Spring of 2020, as the United Kingdom was imminently following Europe’s lead and locking down as a result of the Coronavirus pandemic, I received the welcome news, via email, of a two year part-time post with Beaford Arts working with a small team and delivering a storytelling project through photography, art and film to primary school children.

I had often been asked to contribute to the development of the project, A Voice To Tell Our Story (AVTTOS), over the proceeding few years, as a freelance photographer and educator. The timing of receiving funding for the project was evidently on a knife edge because the threat of Covid had put everything on hold. The Project was to start in September 2020, and my two years beginning a year later. However, delays through lockdown of schools ultimately meant that my start, in a physical face-to-face sense in the classrooms, wasn’t until January 2022.

In 2021 there were many planning meetings with team members, Caroline Preston who led the project and was responsible for the Art side, Lisa Schneidau storyteller, and Matt Biggs filmmaker. It started virtually, via Zoom, and became in person later on. However, Covid still prevented me experiencing any time in the schools until Caroline and Lisa’s very last session with each class. After this I started to really grasp what the project was all about.

I was to essentially teach photographic skills, alongside Matt teaching filmmaking, to primary school children 6 to 10 years old. All of the project equipment had to be bought prior to seeing the schools or meeting the children or teachers. This itself was a nightmare, because of the huge uncertainties that Covid brought on international trade – the 8 Panasonic Lumix 10 cameras all ultimately coming from China.

Despite my many years of teaching full-time to adults and 16+ year-olds, no amount of planning meetings, without classroom experience, would ever prepare me for walking into the schools in January 2022. The biggest problem was gauging the level at which to teach photography. The 10-year-olds would pick up things for more quickly than six-year-olds but how much. how would I be able to keep the children engaged in learning if there were not continually things to learn? I didn’t want to make the cameras automated because the children would simply point-and-shoot just like they might with a smartphone, but I couldn’t make things so complex that they would lose interest through the bar being set too high. It’s not as if a handbook was even available because primary school children simply aren’t taught photography!

The children were very excited to have Matt and I in the classroom. Firstly we introduced ourselves and showed them examples of the kind of photographic and film work that we do. later, on the very first day, we introduced them to the cameras, film (GoPro) and Lumix, that they would be using and encouraged them to start to play with them and make pictures. it was fascinating right from day one seeing what kind of things the children would see through the camera lens, how they might compose, what took their interest. I always wanted to give those children enough room to make their own choices in the picture making process so that photographs through child’s eyes were produced instead of simply copying an adult.

blog-image

Monochrome

The work I am doing for Beaford Arts is already influencing me: I?m starting to see in monochrome again. This is where every photographer started in the age of film, and where I too started in 1985, when I returned to my old comprehensive school to gain a few more qualifications, shooting a roll of black and white film for my CSE Art and Design.

I’ve been an adamant colour photographer since the early 1990’s over the last few years even doggedly squeezing the colour out of dull grey rocks, however North Devon has so many shades of green that sometimes, like Ravilious and Deakins did before, you just want to convert those shades to grey scale.

Estuary Reeds, Topsham, Devon

Path to Westward Ho!

Topsham, Devon

blog-image

Digitisation part 2: Roger Deakins’ Contact Sheets

“Deakins’ negatives are not accompanied by an exhaustive set of contact sheets. A digital contact sheet will therefore be made with a scanner before being digitised. This will be a more lengthy process than the Ravilious collection requiring more time allowance.”

The statement above was the shortened version of my project brief for Beaford Arts Hidden Histories, a project funded by the Heritage Lottery Fund and Leader 5 North Devon. Contact sheets do not exist for Roger Deakins work, he did make them but cut them into strips and slotted them into negative bags with numbers removed. Although his contacts need preserving, and ultimately digitising for the archive, they are useless for the digital database without being able to identify unique negative numbers.

Unlike Ravilious, there was no numerical labelling of Deakins’ negative bags, so I started the process of making new ‘digital’ contact sheets with the first of four folders of negative bags. These negatives were housed in their original archival, but translucent, paper negative bags, often with written notes marks and connotations. Under close inspection on a lightbox I could see that negatives were often filed in a random order, sometimes up-side-down or reversed, sometimes the same number appeared twice and on one occasion 3 times. It became clear that a negative bag didn’t necessarily contain one film, one specific shoot, location, person or group. In comparrison to Ravilious’ contacts there appeared a randomness, or chaos, to his negative filing. However on closer inspection a thematic approach eg ‘railway stations’ had been taken. The negatives themselves were generally in very good condition for their age, with only a few which had stains through poor fixing or washing.

The negatives would ultimately need re-bagging in a comparable fashion to James Ravilious, clear plastic archival bags (this would also be necessary for making digital contact sheets through scanning), so in consultation with Beaford and the Devon Archives Conservator, I went about consolidating the negative strips and making new collections based on single films. This was very time consuming because Deakins (like Ravilious) often loaded his own 35mm canisters of film from a bulk roll so the first negative on a roll could be any number from 0 to 40 and each roll could be any length from approximately 12 to 38 frames.

I made the new digital contact sheets through scanning Deakins’ negatives, held within clear file pages, on the project’s Epson 800 Perfection V800 scanner. This time is was set to scan transparencies at 600 dpi, large enough to be able to identify the place and/or subject in a photograph and to see those images in the context of the photoshoot, but small enough to make physical and data base storage practical. It was also within the independent consultant’s recommendation and the scanner’s linear relationship between quality and time: whilst a negative sheet was being scanned there was just enough time to make minor adjustments to cropping, exposure and contrast of the previously made digital contact sheet.

This was the most exciting and rewarding part of the project to date because I was able to see, as a positive image, that which had only existed as a 35mm negative since 1972. I wonder how many great images from yesteryear have been lost, because the 36x24mm negative or contact image had been brushed aside or unnoticed through their size, or poor exposure. Seeing each of Deakins’ images, with corrections made to exposure and contrast, 24cm wide on my computer monitor brought them to life. If only this technology was available when I was shooting film myself!

I had earlier written how Deakins’ negatives themselves were generally in very good condition for their age; however once the digital contacts had been made it became clear that some suffered from poor developing and light leaks (and in the case of the example above, double exposure), reminiscent of Robert Capa’s celebrated D-Day Landing photographs in the example below. After discussing the issue with the Hidden Histories coordinator we decided, rather than attempting the difficult and time consuming task of perfecting these faults through Photoshop, that we should embrace their endearing, nostalgic qualities; only digitally correcting damage to the negatives post processing.

Digitisation Part 3 Making copies of negatives

blog-image

Digitisation part 1: James Ravilious Contact Sheets

I’ve started an 18 month freelance contract for Beaford Arts. My work is to digitise 10,000, 35mm, black and white negatives, of James Ravilious and Roger Deakins. These date from 1971 to 1989 and cover all aspects of life in rural North Devon.
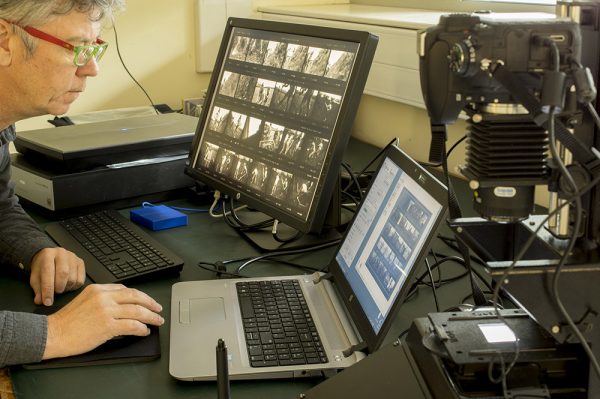
Bowens Illumitran converted to LED for copying negatives is on the right of the image

The archive of negatives is held in a climate controlled, fireproof, strong room at the Devon Heritage Centre in Exeter. This is where the negatives must be kept and downstairs in a conservators office is where I have my work place seen in the images above.

“..James Ravilious’ work includes a complete collection of contact sheets made by the artist. These will be digitised by the Digitiser using a flatbed scanner. Most contact sheets will be straightforward scans, however, some have overlapping images and exposure issues to resolve in digitisation.”

“All Ravilious contact sheets will be digitised to a high enough quality to enable negative selection to take place and research and background data to be gathered without repeated handling of the original contact sheets. ‘Good’ and ‘Best’ images will be marked up on digital contact sheets by the Digitiser, referencing the original database, to ensure easy reference and prevent repeat selection. Two sets of digital contact sheets will be made one for negative selection, and one left unmarked to reveal James’s original markings only, for dissemination purposes. Tests suggest scanning contact sheets at 600dpi enables high quality images suitable for on-screen viewing purposes.”

James Ravilious started his commission from Beaford Arts to “show north Devon people to themselves, in 1973, continuing the Beaford Archive started a year earlier through Roger Deakins (who became the great Hollywood cinematographer). The first two months of my contract have been spent scanning all 2306 of Ravilious’ contact sheets on an Epson Perfection V800 Scanner. This was the first stage of the process to archive the contact sheets digitally so that in the short term a curator can select approximately 9000 of his images for digitisation and in the long term the digitised contact sheets can be themselves searchable items in a database. Ravilious worked right from the start with an archive in mind; archivally processing his negatives as best he could (developing, fixing and washing his negatives in an often difficult, imperfect working environment) and numbering, filing and storing his negative bags and contact sheets. He also annotated his contact sheets on their face and rear indicating his prefered best images, description of place, name of subject etc.

A small percentage of the contact sheets (and negatives) had been archively rehoused in separate new folders prior to my start which speeded up the digitising process. However once I got to view the contact sheet and negatives together in the same folder I noticed some negative strips and many ‘end of film’ negatives which didn’t make it onto the contact sheets. I started to make digital copies of these to add to the digitised contact strips but then abandoned this extra time-consuming work, marking negative bags with ‘post-it’ notes for later in the life of the project.

There were 2 or 3 sets of negatives, and occasional single frames, which had yellowed through under fixing or inadequate washing at the original time of processing the film. These films are not archival and will not last in the long term and will need re-fixing and washing in the coming weeks.

Although the negatives were all black and white I scanned them in colour to preserve the highlighted annotations, often in red pen. However, the drawback of the colour scan was often a slight colour shift towards green or blue, so a selective colour desaturation was applied in Photoshop afterwards. There were also handwritten annotations on the rear of Ravilious’ contact sheets which will need digitising and archiving later in the project.

Today, photographing digitally, one gets used to getting a ‘correct’ exposure. Most people now shoot everything automatically and today’s technology enables us to achieve excellent exposures for most of our photographs. Even professionals, myself included, who use a camera manually, are used to checking our pictures at the time of shooting so that any adjustments to exposure can be made there and then. These same professionals will benefit from incredible advances in sensitivity to light when taking pictures, in comparison to the 100-400 iso films used by Ravilious in the 1970’s & 80’s; and also shoot in RAW, benefiting from its greater exposure tolerance. So it shouldn’t have come as a surprise to find James Ravilious’ contact sheets having both inconsistent exposure, one to the next, and having under and over exposure within a single film. But it did, because the last time I photographed on film was last century, and my last monochrome film was probably at the time Ravilious finished his work for Beaford Arts.

Therefore, digitising James Ravilious’ contact sheets, preserving them archivally for eternity, was a greater task than it seemed. Each sheet needed slight adjustments to exposure at the scanning stage through tweaking the levels of the histogram. Each digitised sheet needed adjustments for some of its images. These adjustments were not to perfect the images, or ‘make good’ his exposure, but to enable a reader of the digital contact sheet to be able to see what the image was, and in the short term to enable the project curator to identify images (negative) to be digitised.

I feel quite privileged to be one of probably only a handful of people to have seen 9,000+ of James Ravilious? images, albeit small and with little detail, and to have gained an insight into his working practice through seeing 2,300+ of his contact sheets made in chronological order through his time at Beaford.

Digitisation part 2: Roger Deakins’ Contact Sheets