blog-image

Public Art pt4 – Realisation

My original intention was to have a completed piece of Public Art on McColl’s window for the beginning of August, the start of the 2 month long Culture Show.

Unfortunately the project was marred by delays. Firstly the relationship with Bidford youth club needed more time to develop and so next week was given here, then, the time needed to install the public art was far greater than originally anticipated. I had naively imagined that a couple of days work outside on the space would have got everything finished, sealed and looking good. A day was booked in the Arts Centre in early August with the intention of laying out all the images in their respective window frames end then installing them in place. I decided to use Scotch Photomount spray glue to stick the 3×4″ prints in place, despite its high price, because it allowed for a little repositioning but was a permanent glue, and it was tried and tested by me in the past. A couple of volunteers, who had participated on BBC workshops in the past, Stuart and Shirley Stickler helped with this process. However after a whole days work only half of one panel was complete and this needed to be varnished straightaway to protected from the weather.

The weather was another important factor in the delay of installing the artwork. August 2015 proved to be very wet in Southwest England. It was rare for a day to go by without a shower of rain. This rain played havoc with my outdoor work which needed extremely dry conditions until it became protected from the rain. Confounding this situation with wetness, when it wasn’t raining it was often very sunny, the sun shining directly onto the windows and making them very hot indeed. The black-and-white A4 card that had been pasted onto the window has shrunk slightly around the edges. Some of them had also started to peel from at the edges from the flat surface, and I needed to add stronger glue to hold them in place.

Another issue, which caused delay, was the varnish. I had spent a lot of time researching varnish, needing something that would give UV protection and protect the work from the rain outdoors. The yacht varnish that I bought was supposed to be clear, but when applied and dried it gave a yellow skin to the work making the images seem faded, like an old photograph. My experience of using varnish indoors on similar work in the past had been very very successful. The varnish from my previous experience had completely sealed the photographs, like a lacquer or resin might have done. I decided to remove the worst offenders of the yellowed pictures and replace them with new ones. I also ordered a clear spray on varnish that seemed to have very good reviews on the Internet being designed specifically for artwork. However this spray on varnish didn’t seal the images as I had hoped and I found that with bright warm direct sunshine often the corners of individual pictures curled upwards.

My cycle of work was that every time there was to be a dry day I would spend the whole day working on the panels. Gluing down any corners that may have curled up, spraying pictures in place and then, by the end of the day stopping only for lack of sunshine, I sprayed the whole lot with clear varnish to seal.

As the artwork started to evolve in the very public space I would often and sometimes continually get members of the public coming up and asking what it was, or commenting on how they liked it, or questioning what it was for? This was a thrilling, but unexpected part of making art work in the public realm. A part of making public art which I recognise as very important but had not factored in the time needed to talk to people who were interested in what I was doing. Having the public’s enthusiasm for what I was doing made the arts practice very rewarding. I was fascinated by the fact that so many people came over looking at the work but could only see small pictures on the window some on their side, some upside down, but they could not see the big picture. It was only when they walked away, viewing it from a distance, that they saw it as a photo mosaic of Bideford Longbridge. When questioned what the image was supposed to be I would often show them how it looked through the wide angle lens of my iPhone and they would instantly see the bridge.

Once all three panels were complete I waited for a very dry day when I knew that everything was absolutely bone dry and then sealed the whole lot under clear sticky back plastic. The clear plastic film was then trimmed all the way around the edge and sealed with exterior white sealant.

The completed Photomosaic on Jubilee Square in Bideford.

blog-image

Public Art pt1 – Concept

1st computer generated photomosaic using Artensoft Photomosic Wizard and random images

Art is rarely just created solely for the artist, often made as a commission or gift, but the majority of art sits in the public realm. Historically this was the gallery wall, the open studio, civic building or hotel lobby; but now even amateur artists and hobbyists can publish their latest work to potentially a mass audience through social media, the art critic’s judgement replaced by peer reviews and the number of likes it receives.

“Public art is art in any media that has been planned and executed with the intention of being staged in the physical public domain, usually outside and accessible to all.” Knight, Cher Krause (2008). Public Art: theory, practice and populism. Oxford: Blackwell Publishing.

Having a piece of sculpture installed into a city square by contractors is a typical example of public art but my experience of making a piece, in the 12ft x 5ft empty frame of a boarded up window, in a very public square over the course of 4 weeks takes ‘public’ to a new level.
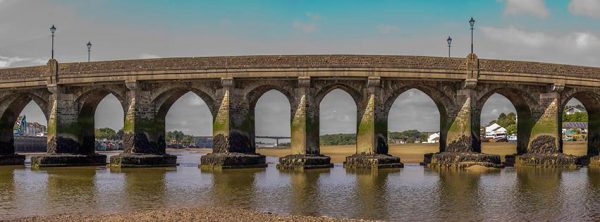
The original image made by stitching 6 frames together with Photomerge in Photoshop

The original image made by stitching 6 frames together with Photomerge in Photoshop

The work, a photomosaic, was conceived 6 months prior to the installation, and submitted to Bideford Bay Creatives for inclusion in their Culture Show ‘art in non-gallery spaces’ for August – September 2015. Once the concept was accepted permission was obtained from the shop manager of McColls locally and nationally and of the building owner to use the blanked out windows for the piece. Permission was given so long as the artwork was temporary or was easily removable in the future.

As this was to be public art I wanted the public to be part of it hence the idea of a photomosaic which I estimated could be made from 700 to 800 separate images, many of which could come from the public realm. I had never made a photomosaic but my arts practice over the last 20 years, from triptychs made with a film camera to detailed interiors of sea caves have been achieved through constructing an image from many frames. I have also been teaching photography through this period and wanted there to be a learning element to the work also. With this in mind I approached Devon Youth Service in Bideford as a partner in the project so that local young people would get the opportunity to experience the photographic arts process and see their photographs in a public space.
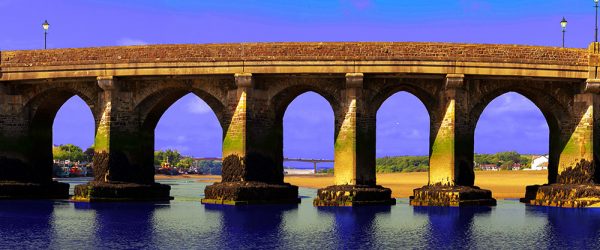
Colour was intensified through hue adjustments and increase of saturation

Colour was intensified through hue adjustments and increase of saturation

Through experimenting with Artensoft Photo Mosaic Wizard software it became clear that a colourful, high contrast, graphic image would be needed to base the mosaic on. The theme of Culture Show was the River, and so I wanted to use Bideford’s iconic, historic longbridge, which dates back to the 13th century to build the work from.
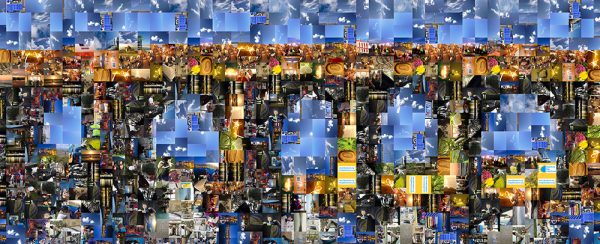
Early attempt at computer generated photomosaic to determine which images worked the best

Early attempt at computer generated photomosaic to determine which images worked the best

The ‘frame’ I needed to fill was wide-screen in shape so I needed a view of the bridge head on, much like it is in Bideford?s coat of arms, however this is a view rarely seen as you need to be in the middle of the river to see it. I took up the challenge on a very low tide with sunshine highlighting the uneven arches of the bridge; and walked to the middle of the channel using a bamboo cane to check for sinking sand. Conscious of the incoming tide the initial photographic panorama was made very quickly. These images were stitched together in Photoshop?s Photomerge enhanced in Lightroom and then the saturation was increased to give me the graphic representation I was hoping for.
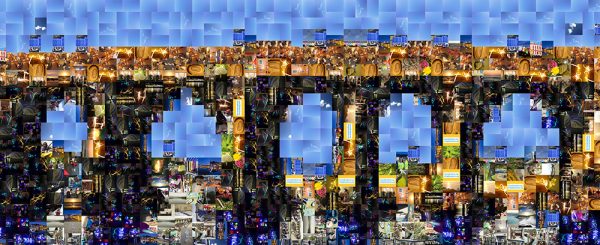
Final Artensoft photomosaic that was used as a guide for the artwork

Final Artensoft photomosaic that was used as a guide for the artwork